Get organized this holiday season by making a simple Christmas Planner to keep up with gift lists, holiday recipes, and more!

Welcome to the Workshop Wednesday blog hop!
If you’re visiting from The Answer is Chocolate, welcome!
Not sure what Workshop Wednesday is about? Check it out here.
I don’t know about you, but I am a list maker.
I feel better about attacking a goal by writing down everything I need to do ahead of time.
And when the goal is HUGE, like say getting ready for Christmas, I really feel the urge to get my planning on!
This year I decided to make myself an official planner so that all of my ideas and needs are all in one spot and easy to find.
So today I want to show you how I made my new Christmas Planner!
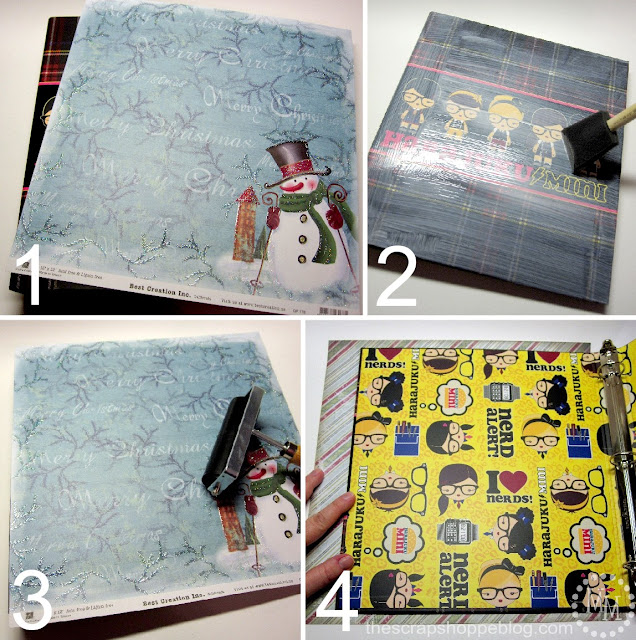
I purchased this 3-ring binder for super cheap last year during the back to school sales.
For the record, I have no idea who these characters are or what the binder says! I’m so uncool!
But I never planned to leave it like this.
I’m going to Christmas-ify it with Christmas-themed scrapbook paper!

Christmas Planner Directions
I kind of have an obsession with Christmas-themed scrapbook paper so I have amassed quite the collection.
I chose a 12×12 sheet I thought would be fun for the front of my binder.
I covered the front of the binder with Mod Podge and laid the paper on top.
Then I used a roller to make sure there were no bubbles between the paper and binder.
The paper is larger than the binder, but we’re going to fold it over inside in the next steps.
Before folding it over though we want to do a little trimming.
Trim the corners at a slight angle.
We’re going to glue down the side first.
Apply some Mod Podge then fold the paper over.
To keep the paper down, apply some “craft clamps” (clothespins!).
Repeat with the top and bottom ends of the paper.
Then repeat the entire process to cover the back of the binder.
Trim more scrapbook paper to fit the inside of the binder and Mod Podge it down.
For the spine of the binder we need the paper to be flexible.
Trim a piece of scrapbook paper large enough to just cover the spine and about 2 inches of the front and back of the binder.
Use very sticky double-sided tape to attach it to the binder.
Only put the tape down the length of the binder (on the front and back sides) as shown with the arrows above.
Do not put any tape where the spine of the binder is.
I added a sticker label to the spine and front cover of the binder.

Now for the true star of the planner!
The pages that go in it!!
Edit: The original planner pages used for this planner are no longer available for download. But that just means I made my own! Find them here: Holiday Planner FREE Printables.
There is no way you can have these downloads in your possession and not be organized this Christmas.
There are files for organizing your Christmas cards, decorations, shopping lists, holiday baking and more!
I cut some cardstock down to 8.5×11 to act as dividers for all of my files.
I cut squares out of scrapbook paper and folded them in half and glued them to the edges of the cardstock dividers to use as tabs.
My new Christmas planner printables come with a sheet of dividers to print and cut.
I will be filling out the sheets for gifts over the next week as I plan out my handmade ideas for my friends and family!
Do you think a Christmas planner would help you?
To continue with the Workshop Wednesday blog hop please visit Tracey at My CreativiT!

>> See where I party! <<

Melissa
Monday 12th of December 2022
These are quite lovely and just what I needed. Thank you so much!
Jocelyn
Monday 16th of July 2012
Maybe if I had an awesome planner like this, I would be so scatterbrained when it came time to doing Christmas stuff!!! This is awesome and I love all the fun details you used!!
Kathryn Ferguson Griffin
Saturday 14th of July 2012
I think I might just have to do this! Thank you for sharing. Visiting from My Repurposed Life. Would love it if you would share this at my Make it Pretty Monday party at The Dedicated House. http://thededicatedhouse.blogspot.com/2012/07/make-it-pretty-monday-week-5.html Wishing you a grand weekend. Toodles, Kathryn @TheDedicatedHouse
Tauni
Wednesday 11th of July 2012
Holy cow girl, you are super-duper organized! I haven't even started thinking about Christmas and probably wont until about October :)
Thanks for sharing your adorable binder. It's much cuter than my plain old excel spreadsheet.
xoxo, Tauni
Natasha SerenityYou
Wednesday 11th of July 2012
love this!!! I make a Christmas planner every year
would love it if you could share this on my link party - http://serenityyou.blogspot.co.uk/2012/07/serenity-saturday-47.html