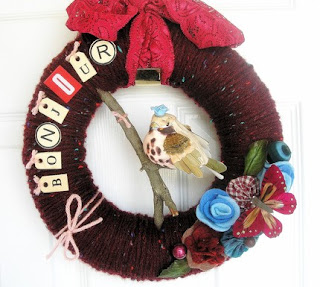
I’ve been trying desperately to come up with an idea for a new wreath for our front door. If you can believe it, our Christmas wreath typically stays up until spring! I just don’t have a good *in between* wreath to put up in February or March. Until now!
I love it! Its not season oriented. The colors work for any time of year. Its perfect! Let me tell you how it came to be…
In my search for the perfect *in between* wreath I stumbled across the most amazing Etsy store. I was so completely inspired with the unique wreaths over at KnockKnocking. They are absolutely adorable. And so whimsical! And made most entirely with yarn and felt.
I had an “I could make that!” moment. So I decided to try my hand at making a yarn wreath.
Materials
styrofoam wreath
fuzzy yarn
(how much yarn you need will depend on the size
of your wreath. Mine took ~60 yds)
(how much yarn you need will depend on the size
of your wreath. Mine took ~60 yds)
felt
ribbon
wood monogram (optional)
spray paint (optional)
beads
3-in-1 Advanced Craft Glue from Beacon
(or whatever adhesive you prefer)
1.) Spray paint your wooden letter. I found my letter at Hobby Lobby. I put on 2 coats of brown spray paint as well as a clear protection coat since it will be outdoors.
2.) Tie your ribbon that you will use to hang the wreath around the styrofoam. This way it will be hidden when you started wrapping the wreath with yarn. Alternatively you can wrap the ribbon later if you want it to show over the yarn.
3.) Now you’re ready to start wrapping the yarn around the styrofoam frame. I worked with ~2 yards of yarn at a time so it would not get tangled up. Place a small line of adhesive on the styrofoam in the direction you will be wrapping the wreath. Place the end of your yarn in the adhesive and give it a few seconds to start to dry (that’s all it takes with the Beacon adhesive! its great stuff!). Start wrapping the wreath with the yarn. Try not pull the yarn too tightly but snug enough so that it does not hanging limply from the wreath. You want the yarn to keep its fluffiness! Each time you wrap, push the sides together so they are snug against each other and you cannot see the styrofoam between the strands of yarn. It can be tedious, but I did all my wrapping while sitting front of the tv.
4.) To attach the wooden letter to the wreath, I wrapped some coordinated ribbon around the top of the letter and adhered the other end to the stryofoam under the yarn. This is probably not the best way to do this. You probably will want to do this step before you wrap the wreath with yarn. {Learn from my mistake!}
5.) Make (or purchase) some felt flowers in colors matching those in your yarn. I went with a blueish turquoise, dark brown, cream, and caramel brown. I added beads to some of the flowers to make them stand out more.
6.) Nestle the flowers into one of the bottom corners of your wreath. I laid all the flowers out where I thought I wanted them to go before glueing them down.
7.) Add any other accents to the wreath as you see fit. I added a brown bow and a butterfly charm to finish my look.
8.) Scotchgard is your friend!! Since your wreath will be outdoors it would be a good idea to add a couple of coats just to prevent any possible staining.
More gratuitous shots of the felt flowers:
All in all this was a pretty inexpensive project. The yarn cost me the most at ~$6. Even better if you can catch it while its on sale. I got too excited to wait!
One last photo of the wreath:
*sigh* I just love it!
You can find a video tutorial for the felt flowers here!
Linking up to
I have started truncating my posts to avoid having my content stolen. I hope you’ll click over to finish reading the post. Thank you for understanding!


Charlotte
Tuesday 5th of June 2012
So cute! I featured this wreath on my blog.www.duzzit.blogspot.comThanks for sharing!
The Thin Thread
Saturday 11th of February 2012
This is fabulous! Thanks for sharing!
Something Wilde
Tuesday 28th of September 2010
So cute - I love all those little details like the letter and the butterfly! Nicely done!
Kelli @ RTSM
Tuesday 28th of September 2010
Such a cute wreath! I need more just because wreaths too...mine always end up staying on the door way past whatever holiday they were up for:)
Suesan
Tuesday 28th of September 2010
very cute. I love the felt flowers and the monogram.
http://froufrugal.blogspot.com