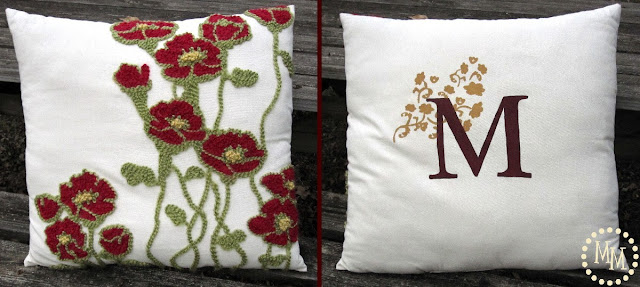
I have a fun pillow makeover to share with you today!
Back in the spring I found the most amazing ginormous pillow at Rugged Wearhouse for only $5. It was a blank canvas just waiting to be transformed. I scoured Pottery Barn for inspiration pillows and stumbled across two that would look great in my living room: the poppy pillow and the lavendar monogram pillow.
Both of these pillows are embroidered and, if you’ve ever visited my blog, you know that I DO NOT sew. But that’s okay. I had other plans to get these looks!
I used colors that would match my living room (red, olive, and gold) for each side of the pillow.
(Yes, in case you didn’t realize, I put both of these designs on the same pillow. I love reversible projects!)
Let’s start off with the pillow itself. Like I said, its ginormous! 2 ft x 2 ft. Seriously!
Next up, let’s talk about the poppy side of the pillow.
I remember (way back in the day) in high school doing a very fun project in my Spanish class involving Huichol yarn art. Its a technique of creating a design using yarn and moving the yarn in such a fashion as to give your artwork movement. I loved it! And thought it would be perfect for this project.
I scoured several stores looking for the “right” yarn. I tried to find some that looked crocheted to match the Pottery Barn pillow better, but ended up finding this fun ribbed yarn in all of the right colors.
I printed off a full 8.5″ x 11″ image of the pillow to use as a guide, found a starting point on my pillow, and proceeded to draw out my first poppy.
I drew one poppy at a time, filling each in with yarn befor moving on to the next because adding the yarn actually made the image slightly larger than the original drawing. I didn’t want to mess up my spacing and wind up overlapping my images!
Also, I only drew the outline of the red part of the poppy because I knew it would eventually be completely covered with yarn in the end and the marker would never be seen.
I adhered all of my yarn with my favorite fabric adhesive, Fabri-Tac from Beacon.
(This stuff is seriously amazing. Better than a glue gun!! I swear!)
The turquoise line in the above photo represents the outline of the flower (where I drew it with the marker). I always did the outline of the flower first with the yarn then went back and filled it in the rest.
The orange line with arrows represents how I filled in my yarn. There was no specific technique. I just wanted to create movement by keeping the yarn in what would look like a swirly manner.
After finishing a flower with the red yarn, I went back and outlined it with the green yarn. I saved the stems and leaves until the end so I would not overlap them with any of the flowers I had yet to create.
I stopped periodically to compare my version to the Pottery Barn printout and check out my progress.
I was really starting to see it come together!
After finishing with the red and green yarn, I went back to fill in the centers of the fabric with the gold yarn. I tied a knot in the yarn then, to thicken it, tied two more knots on top of the original knot. I trimmed off the knots and layered them in the centers of some of the flowers.
I love the texture the yarn adds to the pillow.
I ended up leaving off the little flowers that Pottery Barn scattered around the pillow.
I really like the extra white space and the asymmetric look.
For the monogram side of the pillow, I took some liberties from the Pottery Barn version and instead of using a lavendar plant, I used a poppy floral design to help tie it into the reverse side of the pillow.
I created the design on my computer then separated the images into two so I could cut them out using my Silhouette.
I cut my images out on freezer paper to iron on and use as a stencil. I ironed down the floral design first. The little detail images in the poppies were so tiny that I just left them off. I did, however, keep the detail images in the smaller flowers.
I still had all of my acrylic paint from my Custom Wall Art project from last year which is also in my living room so I already had on hand the paint colors I would need. I mixed the paint with some acrylic paint fabric medium and went to work.
Once the floral design was dry, I went back and ironed on the M freezer paper stencil and painted it also.
This side of the pillow literally only took a couple of hours to complete, including drying time. Whereas the poppy side of the pillow took a good 6 hours or so!
Can you see that I traced around the M with a fabric pen?
Since my pillow was prestuffed with no way of getting the stuffing out without ripping out threads and resewing, I just painted on a stuffed pillow. Probably not the greatest for freezer paper stenciling, but it worked okay. I just used the fabric pen to tidy up the edges of my monogram.
So let’s do a tally!
Pottery Barn Poppy Pillow: $49
Pottery Barn Lavendar Pillow: $29
Total: $78
——–
Pillow: $5
Yarn: ~$4 each so $12
Glue: $5
Paint and Medium: $4
Freezer Paper: $5
Fabric Pen: $4
Total: $35
I had the paint, freezer paper, and fabric pen on hand already so really my total could be ~$22!
Not bad, especially considering it is completely customized to match my living room!
Note: I do not let my children near this pillow. Just in case, you know? 🙂


Karren Haller
Wednesday 20th of February 2019
Thank you for sharing on Wonderful Wednesday, it has been pinned and shared on Instagram. Please stop by and share again! Have a great week!
Kippi
Tuesday 19th of February 2019
Really neat idea! The pillow turned out perfect. Happy Crafting, Kippi #kippiathome
Alexandra
Monday 11th of February 2019
WOW! I am so impressed with this pillow!! I don't think I would have the patience to do something like this, but it's incredible.
Danielle Miller
Tuesday 19th of November 2013
AMAZING!
Michele {The Scrap Shoppe}
Sunday 1st of January 2012
April, I don't let anyone on the pillow! Its strictly for decpr. The monogram side would be fine to lay on, but the yarn side wouldn't be able to hold up to day-to-day use. My pillow still looks great today! :)